
Läs guiden på svenska
Introduction
MyMemo is a highly customizable memory game suitable for both children and adults in a variety of educational settings. Here are a few suggestions we’ve received from users:
Ask children to make their own deck in a certain theme, e.g. seasons, colors, objects, etc.
Learn foreign languages in a fun and playful way.
Create decks where the audio recordings give fun little instructions relevant to the image, e.g. “bark like a dog three times”.
Teach upper case and lower-case alphabets with split deck.
Customize speech therapy sessions with games suited for each individual student.
Create split decks with items that rhyme with each other.
play
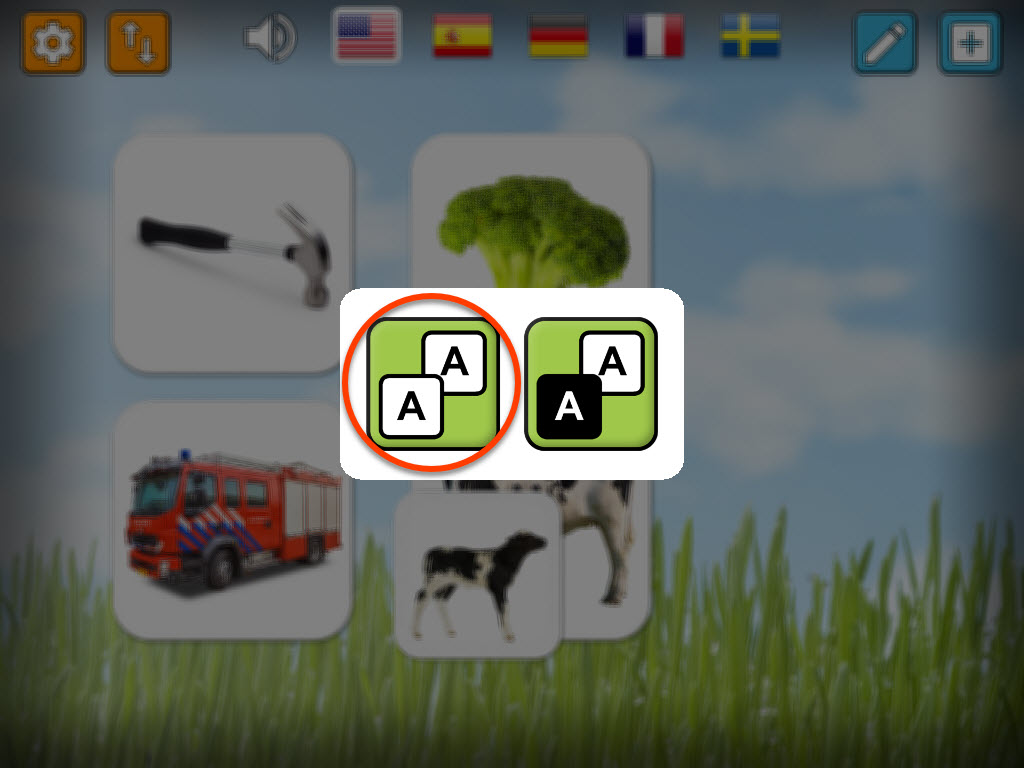
To start the game, choose between one of the four standard decks or a previously created custom deck. While playing you can select the number of cards to use, from 6 to 20. Note that for custom decks the number of cards available in the deck determines how many cards you can play with.
Press on a card to flip it. Match two cards and you will hear an audio recording, if one has been added to the image. While playing, the counter in the lower left corner keeps track of how many turns are played. If you are playing with a split deck, such as the standard animal deck, you should match cards that are associated with each other but not identical. For example, a cow matches with a calf. Split decks are shown with two cards on the deck selection screen.
Press the refresh button in the top right corner to start a new game (while also changing the card background image), and the back arrow in the top left corner to go back to the deck selection menu.
Note that MyMemo comes with audio support for English, Spanish, German, French and Swedish. To add another language, you need to record your own audio, as described in the section Editing decks and cards.
creating a custom deck (adding images and audio)
To create your own decks press the plus button in the top right corner on the deck selection screen. You will be asked to choose between a split deck and a regular deck. For now press the button on the left to create a regular deck (instructions on how to create a split deck are further down the page).
Press on any one of the empty card spots with a plus sign to add an image.

Adding images or text
Choose the camera roll on the left to pick a photo from your device, the camera icon to take a photo with your device, or the text icon to type text onto the card.

Once you have chosen an image you will be able to adjust it to better fill the card. Use one finger to move the picture and two fingers in a pinching gesture to resize and rotate it. Press the checkmark button on the right when you’re happy with the image, or the cancel button on the left to start over.

Next you can optionally add an audio recording. Press the button on the right to do so, or the button on the left to skip audio for now (you can always add it later). If you decide to skip the audio part then proceed down to Completing the Deck.
Tip: Photos stored on your device can be re-used in multiple decks, and added again if you delete or edit the cards. If you take a photo on the fly, however, it is only available on that particular card, and permanently deleted if you delete or edit the card.
adding audio
Press the microphone button on the right to automatically start recording. Press the stop button when you’re done, else the recording will stop on its own after 10 seconds). Now you can choose to discard the recording with the back-arrow button, hear it by pressing the play button, or accept it by pressing the checkmark button.

If you discard the recording you will return to the edit card menu (see Editing Decks and Cards). If you accepted the recording you’ll see that the card now has a play button on it. Press it to hear the recording at any point.

Tip: You can change the audio for the accompanying decks in the same way. For example, if you want the animal deck to be read out in another language or you want to record the sound of the animal instead of the name, just touch the card to edit it and add a recording (see Editing Decks and Cards).
completing the deck
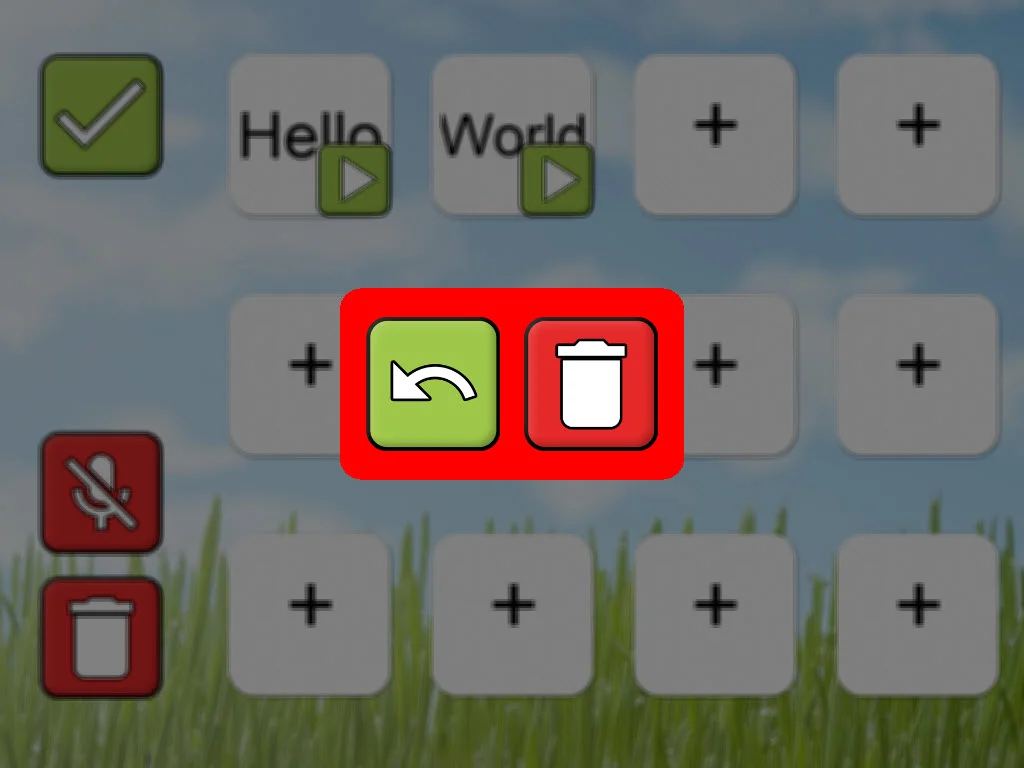
Congratulations! You’ve just created your first card. Repeat the process to complete your deck and then press the checkmark button on the upper left side to save your deck. Or press the trashcan button in the bottom left to delete your entire deck and start anew (see Editing Decks and Cards for instructions on how to edit your individual cards, including deleting them).
Tip: You need at least 3 cards to make a deck playable in 6 card mode, 4 if you intend to play the 8 card mode, and so on.
creating a split deck
On the deck selection screen, press the new deck button (plus symbol) in the top right corner. When prompted, choose the split deck icon on the right.
Creating a split deck follows the same procedure as the regular deck creation but adds one extra stage.
Once you’ve accepted the first image you’ll be prompted to either cancel by pressing the back arrow, thereby deleting the first image, or pressing the button on the right to add the second image. Add the second image, adjust it as usual and save it by pressing the checkmark button. At this stage you can choose to add an audio recording or not.

Note that with split cards each card effectively becomes two. So you only need to fill in 4 of the empty card slots to be able to play a full 8-card game.
editing decks and cards
You can edit both custom and standard decks as long as you have not disabled editing in the settings. Whilst in the deck selection screen simply press the pencil icon in the top right corner and then select which deck to edit (or press the back arrow in the top left to cancel).
For a custom deck pressing a card in the deck creation screen brings up a menu. From left to right, the options are: Cancel, Record sound, Change image (clicking this will allow you to either choose from your gallery, take a new photo or add text), and Delete. If you already have an audio recording for that card a button with a crossed-out microphone symbol will also be present, allowing you to delete it. Note: In a split deck, if you choose to change photo you will be required to change both photos of the card!
For a standard deck you can add custom audio to one or more cards. Simply select the card and press the microphone button on the right to begin recording.

Finally, you can delete the entire deck with the trashcan icon or delete all sounds in the deck with the crossed out microphone icon. These buttons are in the lower left part of the screen and require confirmation in order to avoid accidental deletion.
Copying decks between devices and users
MyMemo allows you to share decks between devices and/or users. To get started press the share button next to the settings button, in the top left of the screen. Note that you will need to read and accept a disclaimer the first time you use this feature.

Copying decks consists of two steps, sharing and importing, with an optional step to remove shared decks. Sharing and importing works using a form of cloud storage service for MyMemo users, where all files are public, but password protected. If you are sharing decks that contain sensitive or proprietary content, then remove the shared archives as soon as you have imported them on the target device(s).
Sharing
Using the device with the decks you wish to share, select the “Share Decks” screen with the cloud icon with an upward pointing arrow. On the right-hand side of the screen select one or more decks that you wish to share. On the left-hand side of the screen type a password which will be used to secure the shared decks. When you press the “Share” button the app will create and upload the password-protected archive containing the decks to our server in Sweden. When the upload is complete you are given a random six-digit “share code”. Note: You don’t need to remember it - The share code, and the password used, is available on the “Remove Decks” screen until you remove the decks.


importing
Using the device where you want to import the decks, select the “Download Decks” screen with the cloud icon with a downward pointing arrow. On the left-hand side of the screen enter the share code of the deck and the password which was used when sharing it. When you press the “Download” button the app will download the archive containing the decks and unlock it using the password.

Removing shared decks
Once you have shared a deck archive it remains on our server until you remove it. You can remove deck archives by selecting the “Remove decks” screen with the list icon. On the right-hand side you can see all the archives you have shared, together with the six-digit share code and the password. Select one or more archives that you wish to remove and press the “Remove” button.

Security
App Family AB grants you a license to host your exported decks free of charge on our servers in Sweden. Exported decks are protected with a password that you set, so App Family AB cannot open or view the contents of exported decks. However, you have a responsibility to set good passwords and only sharing the passwords with people you trust, as well as to remove shared decks when you no longer want them to be available.
privacy
App Family AB does not take any responsibility for the contents of the decks. This means you are responsible for ensuring that the exported deck contents comply with any applicable privacy laws or regulations.
For further information please use the “Contact Us” section of our website.
settings
In order to gain access to settings touch the cogwheel icon in the top left, and complete the simple math question that pops up.
You can enable or disable editing of the decks. This way you can disable editing before you hand the game over to a child and prevent that they accidentally change or delete a deck.
You can also turn sound effects off if working with children who are sensitive to sudden sounds.